Doing manual work is an excellent way to get rid of the stress accumulated in everyday life and spend pleasant moments. All it takes is a little bit of willingness and a dose of creativity. But, besides this therapeutic function, craftsmanship for many can result in a good opportunity to obtain a second income. If you don’t know what kind of manual work to start, how about investing in wood crafts?
We will present you with several options to work with this rich material and the tools you will use.
Wood carving
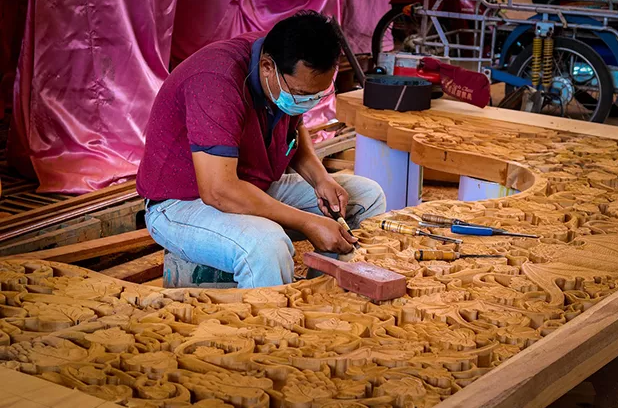
Notching is the art of shaping wood through cutting. This type of craft is very common in Brazil, mainly to express the culture and tradition of certain regions. The technique started by the Indians, who needed to make their utensils, boats, masks and dolls.
The most common objects, the result of carving, are pieces in the shape of animals and landscapes, sacred images, sculptures, churches, and children’s characters folklore. In most cases, the wood used for this type of work is the softest, such as cedar, jackfruit, and pine. But besides wood, some specific tools are needed, such as:
- Chisel: this is a cutting tool to carve the wood. They are found in several shapes and for different functions, among them the straight chisel, to open grooves, smooth chisel and chamfered chisel, to work corners.
- Gouges: they are very similar to chisels, but have a curved blade, used for rounded works.
- Thick and files: they are used to remove burrs and excess wood.
- Lathe: used to hold and firm the piece being worked.
- Files: to give the final finishing, leaving the object smooth, ready to receive, if necessary, paints and varnishes.
- Macetes or hammers: used together with the chisel to carve the wood.
Cracking technique
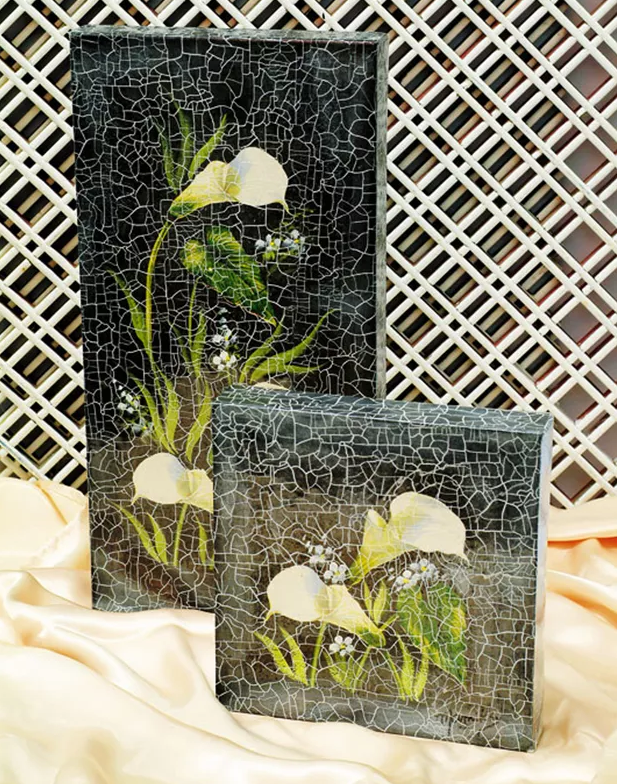
This technique of French origin provides an aged appearance to wood. It is widely used for small jobs, such as boxes and frames. The good thing is that it can be applied to other types of surfaces, such as ceramics, glass, and even on the woman’s nail, this technique was seen. It is very simple to make and on the market, it is already possible to find a ready-made craquelê kit. In general, you will have to have: PVA paint on the desired color for the base, colored craquelê kit (the packaging contains a base varnish and a craquelador varnish) and brushes.
For a cool result, just paint the object with the chosen paint for the background, after drying, apply one coat of base varnish, let it dry and pass another coat. After complete drying, pass the craquelador varnish with the help of a brush. Apply a very generous coat with X-shaped movements, so that the cracks will form in all directions. Wait for it to dry and that’s it!
Quick and simple patina
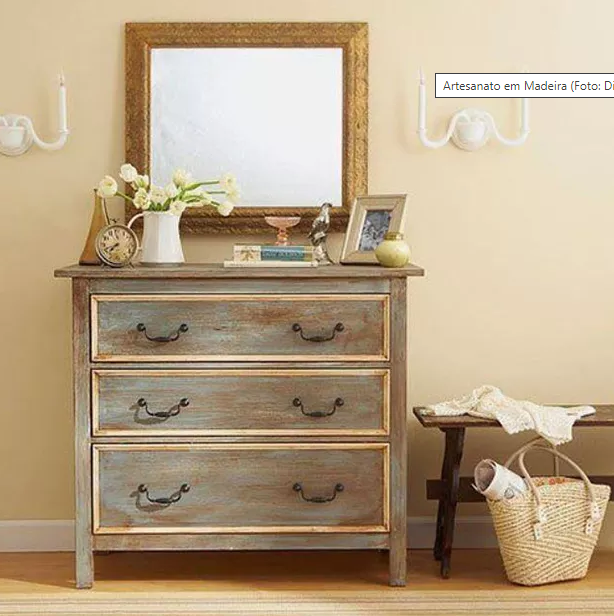
For those who like that old look, half shabby chic, this technique is ideal. It provides great results in old dressers, bed headboards, tables and chairs. And you will need few working instruments. Write it down!
Thick sandpaper: our suggestion is to buy a 60 sandpaper. Leave the furniture without any varnish or old paint. It is the sandpaper that will give the antique effect on the piece. The result is that you will see the bottom of the wood.
Water-based enamel paint: you will use this paint to paint the piece. The advantage of this product is that it dispenses the use of a varnish finish.
Carving: type of brush that is used for this type of work.
If you do not want the wood as a background, you will need to buy another color of paint to make the first coat and another for the second. Did you see how easy it is? Now you have no more excuses for not entering the artistic world, because ideas are not lacking.